HOME
Order Form
Sail Panels
- Sail Panel Choices
- What's a Sail Panel?
- How to Remove & Replace Sail Panels
- Custom Graphics
- Bargains
- Sail Panel Care
Decals
- Decal Choices
- Bargains
Parts
- Parts for Sale
- Parts Interchange Manual
- Firewall Heat Shield
Info
- Fiero Secrets
- Temp Gauge Fix
- Poor Man's Fuel Injector Tester
- Headlight Repair
- Fiero Electric Antenna!
- Fix That Loose Belt!
- Fiero Clubs
Payment & Shipping
References
Rogue's Gallery (photos)
Contact Us
FIERO HEADLIGHT REPAIR
If your Fiero headlights appear to have a mechanical problem then you've come to the right web page. Failure of the headlight mechanism is a frequent problem on Fieros due to their age. The design of the '84-'86 headlight mechanism is different than '87-'88 and the earlier years tend to have the most problems. (For information on how to change '84-'86 headlights to the '87-'88 style, go to the end of this writeup.) All years have a reversible motor with a worm gear on the motor shaft; the worm gear drives a circular white nylon gear that turns the output shaft to the headlight housing linkage. The method to transfer the torque from the white nylon gear to the output shaft is the source of most problems. (But not all.)
On '84-'86 Fieros there is a drive coupling (green plastic on the units I've seen) in the center of the white nylon drive gear that disintegrates over time. The remains of this coupling have been described by others as "hard grease" or "gear shavings", but from what I can see it's just greasy remains of the coupling. Sometimes pieces from the coupling jam the gears, cause slow operation, and eventually cause teeth to be stripped from the nylon gear. If the nylon gear is replaced without also replacing the coupling then the nylon gear teeth are very likely to strip again prematurely. Therefore the trick is to replace the drive coupling as well as the gear. It is possible to repair the coupling before the gear is stripped (when the headlights first begin to malfunction) and naturally this is the best course of action. A procedure for replacing the drive coupling is described in detail below.
If the nylon gears need to be replaced your least expensive solution is to pull a used motor from a junk yard, but new OEM (original equipment manufacturer) gears and drive couplings (sometimes called 'bumpers') are available inexpensively (around $25) from Rodney Dickman (http://www.rodneydickman.com). Rodney also has the electrical and brush assemblies if you need them. Metal gears are available from Alan Mooty, Easy Tech Ind., Inc., 8061 Nicklaus Drive, Orlando, FL 32825 (407) 275-5040. Gears are $45.00 each including shipping. And a very reliable source for a complete headlight motors is Ed Parks at the Fiero Factory in Toney, Alabama, phone (256) 420-5391 or e-mail at fierofactory@juno.com.
On '87-'88 Fieros the headlight drive system was re-designed but a similar problem occurs. The headlight linkage output shaft is driven by a triangular plastic rotor that is turned by a nylon gear via what I believe is a clutch system. The clutch appears to prevent the motor from stalling abruptly at the end of the travel linkage or if something impedes the headlight movement. The clutch consists of three small solid white rods or rollers (others have called these bushings) that appear to be made of white plastic. These rollers fit between the lobes of the triangular rotor within the body of the nylon gear. If the headlight is jammed, the triangular rotor squeezes past the rollers until the motor shuts off. Problems occur when, as in the '84-'86 models, the plastic rollers disintegrate and jam the gears inside the case or disintegrate and fail to transmit rotary motion to the output shaft. The result is headlights that operate erratically at first, then not at all.
I have replaced '84-'86 drive couplings with hot-melt glue for a few cents each. I have also used RTV silicone sealant. I believe the couplings could also be replaced with epoxy, but I have not tried this method. Dave Rodabaugh makes a drive coupling from RTV sealant that works well. Again, your best bet is to get OEM replacements from Rodney Dickman. The '87-'88 rollers can be replaced with 1/2" x 1/2" nylon spacers available at hardware stores and home centers. (These have a hole down the center, but this is not a problem.) The correct size is 0.480"-0.482" diameter by 0.450" long. You will have to do a little sanding to get nylon spacers to fit. Put the spacers on a long 6-32 machine screw with a nut behind it. Then chuck the assembly in a drill and use sandpaper to reduce the diameter to about 0.48". The first headlights I repaired this way have been in service perfectly since June 1997 with no evidence of deterioration. Rodney Dickman sells replacement rollers for less than $5, complete with instructions. Rodney's web page address is http://www.rodneydickman.com.
HEADLIGHT REPAIR PROCEDURE ('84 -'86 only)
While the typical headlight problem can be electrical in nature, it is usually mechanical as described above. This can be determined with certainty only by disassembling the motor housing. If you get to the point where you want to disassemble the motor, here's how.
1. Remove the headlight assembly from the car after unplugging the headlamp wires and the motor wires. There are four 10 mm nuts holding each assembly. Loosen the lower two nuts first (no need to remove them) then remove the upper two. You will have to raise the headlight by manually turning the knob on the motor so you can reach the lower nuts. Help it with hand pressure if it sticks or won't move. Then lower the headlights and remove the upper nuts. Tilt the headlight assembly forward slightly until it clears the mounting bolts and lift it from the car. Take the headlight assembly(ies) to a workbench.
2. Disconnect the small lever arm that connects the motor output shaft to the headlight linkage. It is held with a "C" clip. This lever arm is on the outside of the motor housing and is what drives the headlights up and down. Unbolt the motor from the headlight assembly and set the assembly aside. Remove the nut which attaches the lever arm to the motor output shaft. Save the nut. Pull the lever arm off the motor output shaft and set it aside.
3. Drill out the rivets which hold the motor housing together until they are weakened enough to drive them out with a punch or small nail. Do not drill so much that you enlarge the holes in the housing. (The '87-'88 motor housing is held together with screws.) If you purchase a replacement gear from Rodney Dickman it will come complete with replacement screws for the housing.
4. In addition to the rivets, the motor housing is held together with what appears to be white silicone adhesive, similar to what you might use for bathroom fixtures. Carefully split open the motor housing using a screwdriver. There are slots around the edge for this purpose. As you open the housing, hold it with the smaller side of the housing on top; this is the "empty" side and will minimize the chance something might fall out before you can see where it fits. Set the top half of the housing aside.
5. Look around the inside of the housing to see what might be loose. You will see the electric motor, brushes, high-torque switch, a worm gear, a metal drive gear, and a nylon gear. You will typically find old grease and tiny shards of green plastic. The green plastic is what is left of the drive coupling. You will replace this coupling in Step 11. If the metal or nylon gears are stripped at any point on their circumference you will need replacements.
6. If the gears are ok and only the green drive coupling is shattered you must remove the nylon and metal gears to effect repairs. The nylon gear and shaft must be removed from the housing as a unit. If the shaft with the nylon gear won't pull out easily then it can be pressed out in a bench vise. (I have never found one that did not need to be pressed out.) Put a couple of pieces of wood (I use 2 x 2 about four inches long) on the motor housing straddling the nylon gear. Then put the whole unit in the vise and tighten the jaws against the end of the shaft (where you removed the nut in Step 2) and the two wood blocks. Watch to ensure you do not overstress and crack the housing. You may need to tap on the shaft or housing gently as you tighten the vise to get the shaft to pop loose.
7. When the shaft is pressed out of the housing, remove the housing from the vise and pull the shaft free if it hasn't fallen out. Also pull out the metal gear (don't lose the spring washer on the end of the shaft). Clean them both in solvent to remove all the old grease and plastic particles. Clean out the housing.
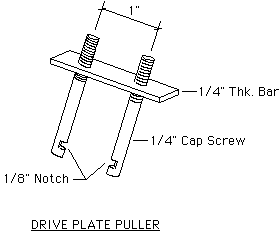
8. Now remove the metal drive plate which is connected to the gear shaft by a press fit. This drive plate is black and has four small metal tabs that are bent at 90 degrees to the plane of the drive plate. These metal tabs fit into the green drive coupling, but the coupling is typically disintegrated with just a few large chunks stuck between the drive plate and the nylon gear. The drive plate must be removed in order to replace the drive coupling. It is difficult to pull the drive plate off the shaft because of its press fit. I had to make a special pulling tool to do this. Other people have reported using Vise-Grips, but I have not tried this for fear of damage.
My pulling tool was made from two 1/4" cap screws (bolts that are not fully threaded) with the heads cut off. The end of the bolts with no thread was carefully notched with a file about half way through the bolt. The notch in each bolt is hooked under the drive plate to pull it from the shaft. The threaded ends of the bolts are inserted through holes in a 1/2" wide metal bar (I used 1/4" thick aluminum, but anything will do). The two holes in the metal bar for the bolts are drilled 1" apart. The bar rests on the end of the gear shaft and the notched bolts run through the holes in the bar down to the metal drive plate. Nuts are put on the bolts and slowly tightened after the notch in the bolt is hooked over the drive plate. The bolts tend to slip off the drive plate and may have to be held with slip-joint pliers, but the system does work eventually. Here is a rough sketch of the tool. The nuts are not shown.
9. When the drive plate has been removed from the shaft, pull off the nylon gear. This can be done by hand but it will tend to catch on the burr left from the drive plate. Remove any residual pieces of the damaged drive coupling and clean the gear and drive plate in solvent.
10. Gently hold the nylon gear in the vise or mount it in some other holding device that will keep it steady while you replace the drive coupling (the damaged green plastic). Position the nylon gear horizontally with hollow side up and the four internal "spokes" visible. This is the side where the drive plate mounts. [Note: strictly speaking, the nylon gear can be left on the shaft. I find it easier to follow the next step with the gear removed, but it is not mandatory.]
11. Get a hot-melt glue gun and about 4 to 6 inches of glue stick. Use a glue stick that is as hard as you can find (not brittle) at room temperature. Allow the glue gun to heat up well. When the gun is ready, put hot glue into the hollow side of the nylon gear. Quickly fill up the cavity in the gear to the edge in all four sections, then embed the drive plate into the hot glue with the four metal tabs straddling the four spokes in the gear. The drive plate must rest against the hub of the gear. When it is cool, the glue will have replaced the green drive coupling. Remove the drive plate, reinstall the gear on the shaft and then the drive plate (the drive plate will have to be pressed on) and reassemble the gears into the housing. Use grease moderately on the gears.
An alternative to hot-melt glue is silicone sealant. I tried this on one headlight repair and it worked fine. Fill the cavity of the nylon gear with silicone sealant instead of glue and place the drive plate in place in its final position. Let it cure overnight, then follow the instructions for the hot-melt system.
Once again, the best replacement for the drive coupling is an OEM version from Rodney Dickman.
12. Place the two halves of the housing together using silicone sealant (make sure there is no grease on the mating surfaces) and hold the housing together using 4-40 or 6-32 bolts and nuts. (You can also enlarge the holes in the top half of the housing and use 1/2" long sheet metal screws.) I use Loctite 242 to insure the nuts do not come off the bolts.
13. Replace the lever arm and nut, then reinstall the motor and headlight assembly in the car. Test it and refer to the last part of Step 5 if it doesn't work properly.
That's it!
If you would like to change your '84-'86 Fiero headlights to the '87-'88 design, here are the instructions from Ed Parks (fierofactory@juno.com).
"You will need the underhood light wiring harness (unplugs just under the brake booster), headlamp relay, radiator fan relay, and both headlamp motors. The motors will bolt to the older frames. The hardest part is routing the wiring but the conversion will make a more reliable, smoother, quieter system that is less expensive to repair. Parts can come from any '87-'88 and make a nice upgrade to the '84-'86s."
If you don't have the necessary parts, you can get them from Ed Parks.
Article copyright January 1999, October, 1999, Paul McKibben