I put off my clutch replacement for quite some time. The clutch would slip on hard acceleration, but if I would drive the car more delicately, it would perform OK. It recently started grinding when shifting into certain gears, especially into reverse, which was the problem that really inspired me to see what was going on with the transmission. I debated whether this was a job I could do myself in my garage with no engine hoist and a limited supply of tools or if I should pay someone else to do it for me. After receiving several quotes ranging from $450.00 - $800.00, I made an appointment to have the job done. I asked the transmission shop that was doing the job to change the oil pan gasket since they would have the cradle down to remove the transmission anyway. I was told that they would not be willing to do that since they don’t do mechanical repairs outside the transmission. After debating the issue with him, he said he would see if the shop next door would stop by and replace the gasket while they had the transmission out. They were willing to do so, but would charge me an additional $150.00 to replace the gasket! This additional cost inspired me to look more closely at doing the job myself. After researching the parts required, I figured I could replace the clutch, oil pan gasket, shocks and struts, and still save money on the whole project. I decided to purchase most of the parts from Pep Boys, partly because they were kind enough to sponsor the 2000 and 2001 Fierorama for NIFE. Their prices were also better than many other part suppliers.
Day One:
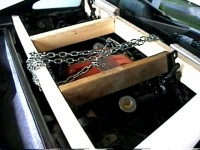
I debated whether to drop the whole engine and transmission, but I really didn’t want to have to open the A/C & cooling systems. I ended up dropping the transmission only this time. I started by purchasing some 2x4’s and a chain to build an engine support. After removing the trunk lid, I measured and cut the 2x4’s and assembled them into a ladder shaped unit that sat on the strut towers, and on the trunk lid hinge bracket on the front side of the engine compartment. A chain was attached to the engine hoist points, and wrapped around the 2x4 brace.
Once the engine was properly supported, I jacked the front end up and set it on jack stands. I then jacked up the rear as high as my floor jack would reach, and supported the rear with two jack stands and a 2x4 underneath the car about where the passenger and driver’s door end. I figured the 2x4 would help distribute the load. I had read that it’s a good idea to weigh down the front end in order to keep the car from tipping backwards, so I placed a bag of concrete on top of the spare tire.
I thought I would start with the easy part first, so I removed the driver’s side shock, and replaced it with a new one. The passenger side proved to be much more difficult. The bushing that the lower bolt runs through was rusted to the bolt. This prevented me from being able to remove the bolt and shock. I got around this by cutting out part of the shock with a grinder, and driving a chisel into the bushing to separate it from the bolt. So much for the easy part of the job!
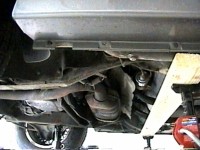
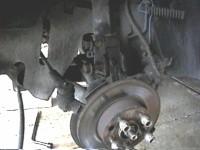
Next, I drained the engine and transmission oil. I removed the rear calipers, parking brake cables, struts and axles. This went fairly well, but a large breaker bar was needed to loosen the lower strut bolts. I then proceeded with disconnecting anything else that was required in order to drop the transmission. This included shifter cables, clutch slave, and intake air hose. Every procedure I read indicated that the exhaust crossover pipe had to be removed. It looked to me like there was plenty of clearance available even with the crossover installed to remove the transmission. As it turns out, the transmission can be removed without completely removing the crossover pipe, but if I were to do it again, I would probably remove it completely. I did disconnect the crossover from the front manifold and loosened the exhaust bolts connecting the crossover to the rear manifold. This gave me enough play in the crossover pipe to move it out of the way to clear the transmission.

Day 2:
I started the second day by rebuilding the struts. I was able to borrow a spring compression tool from Pep Boys. Replacing the struts was not all that difficult. The upper strut bolts were difficult to remove, so I had Pep Boys use an impact wrench to break them free for me. While the struts were disassembled, I took the opportunity to clean and paint the strut tower components, and touch up a couple rust spots on the springs. Fortunately, help arrived on day 2. My father was kind enough to donate some time to help me with the engine cradle & transmission removal. Without his help, this job would not have been completed. Removing and installing the transmission is definitely a 2-person job. We used the breaker bar again to loosen the engine cradle bolts. The driver’s side rear bolt was especially stubborn, and it took both of us pulling on the breaker bar to break the bolt free. Needless to say, all bolts were treated with anti-seize before re-installation. The cradle came down quite easily, and was moved out of the way so that we could proceed with working on extracting the transmission.
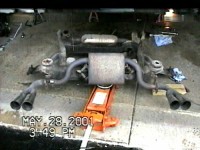
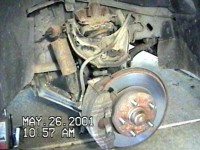
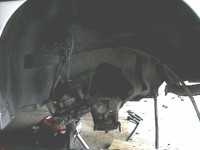
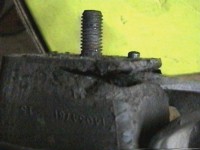
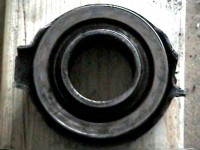
I found a surprise once we had the cradle removed. The rear transaxle mount was torn. I had been experiencing a “bucking” motion in low gear/low speed, and this was in part due to the torn mount. I decided to replace both transaxle mounts, since they were very inexpensive. To remove the transmission, we used a floor jack underneath, and a rope from the topside in order to keep the transmission from moving around while we lowered it. The transmission came out fairly easily, although we had to remove the shifter cable bracket in order for it to clear the frame. Another surprise was discovered after we had the transmission out. One of the tabs on the release bearing was broken off. I’m sure this resulted in the grinding problem I mentioned earlier.
Removing and installing the axle seals was more difficult than I anticipated. I didn’t have the proper punch to re-install the seal, so I improvised, and purchased a piston ring compressor that was the right diameter to tap the axle seal back into place. An odd way to install the seal, for sure, but it got the job done. The oil pan was then removed and cleaned. We spent the remainder of day 2 cleaning parts, and preparing them for re-assembly. I dropped the flywheel off at Pep Boys in order to have it resurfaced.
Day 3:
I started day 3 by installing the oil pan, alternator belt and air conditioning compressor belt. My father returned to help get the transmission reinstalled. The rear main engine seal was exposed when I removed the flywheel, so I decided to replace it. The flywheel, clutch, and new pressure plate mounted to the engine very easily. Getting the transaxle back in position so it could be bolted to the engine was somewhat challenging. We installed the transmission in the same manner that it was removed. A rope was used from the topside to help stabilize the transmission, and a floor jack was used underneath to do most of the lifting. Again, clearing the frame became a challenge, but eventually we wrestled it back into place. From this point forward, the job went very smoothly. Re-connecting all the removed components was pretty straightforward. The first test drive was taken directly to Pep Boys in order to have the alignment done. The car handled extremely poorly on the way up there, but after the alignment was completed it was back to normal.
Conclusion
This was a difficult job, but I’m pleased to have done it myself. Doing your own work gives you an opportunity to replace additional parts along the way at a reasonable cost. It also gives you a great opportunity to spend some extra time cleaning & painting parts as needed. I would guess that this job could be completed in two days if you had better tools, and someone on hand that has experience removing & installing the Fiero transmission. I was happy to have completed the job just in time for the 2001 Dells Run. The car drove very well, and no further adjustments were required.
Cost Breakdown
| $129.99 | Clutch/Pressure Plate/Release Bearing |
| $30.00 | Flywheel resurfacing |
| $10.99 | Front transaxle mount |
| $10.99 | Rear transaxle mount |
| $15.98 | Axle Seals |
| $7.49 | Oil Pan Gasket |
| $5.18 | Lumber (2x4’s) |
| $13.14 | Chain & hardware |
| $21.99 | Rear Main Engine Seal |
| $39.98 | Shocks |
| $69.98 | Struts |
| $10.24 | Alternator Belt |
| $5.99 | A/C Belt |
| $8.99 | Piston Ring Compressor |
| $8.99 | Exhaust Flange Gasket |
| $2.98 | Misc. Fasteners |
| $11.98 | Exhaust bolts |
| $1.99 | Gasket Sealer |
| $54.99 | Alignment |
| $461.86 | Total |